Sunday, May 10, 2020

Pound Cake

I love adding sour cream to any cake because it adds moisture and lightness. I understand there are people who love dense, rich, sweet, pound cake. I love them too, from time to time. But I prefer lighter, fluffy, not-so-sweet pound cake and this is the perfect recipe: 

https://www.youtube.com/watch?v=iq62eKar-Xg

Take butter, egg, and sour cream to room temperature 1 hour before starting.

120g butter
170g sugar
Vanilla extract
2 eggs
200g sour cream
240g all purpose flour
6g baking powder

1. Mix butter lightly
2. Add sugar to butter, mix at medium speed ~4 min
3. Add eggs one by one, mix 2-3 min each
4. Add a few drops of vanilla extract
5. Add sour cream, mix at medium speed 2-3 min
6. Sift in all purpose flour and baking powder. Mix by hand by gentle folding

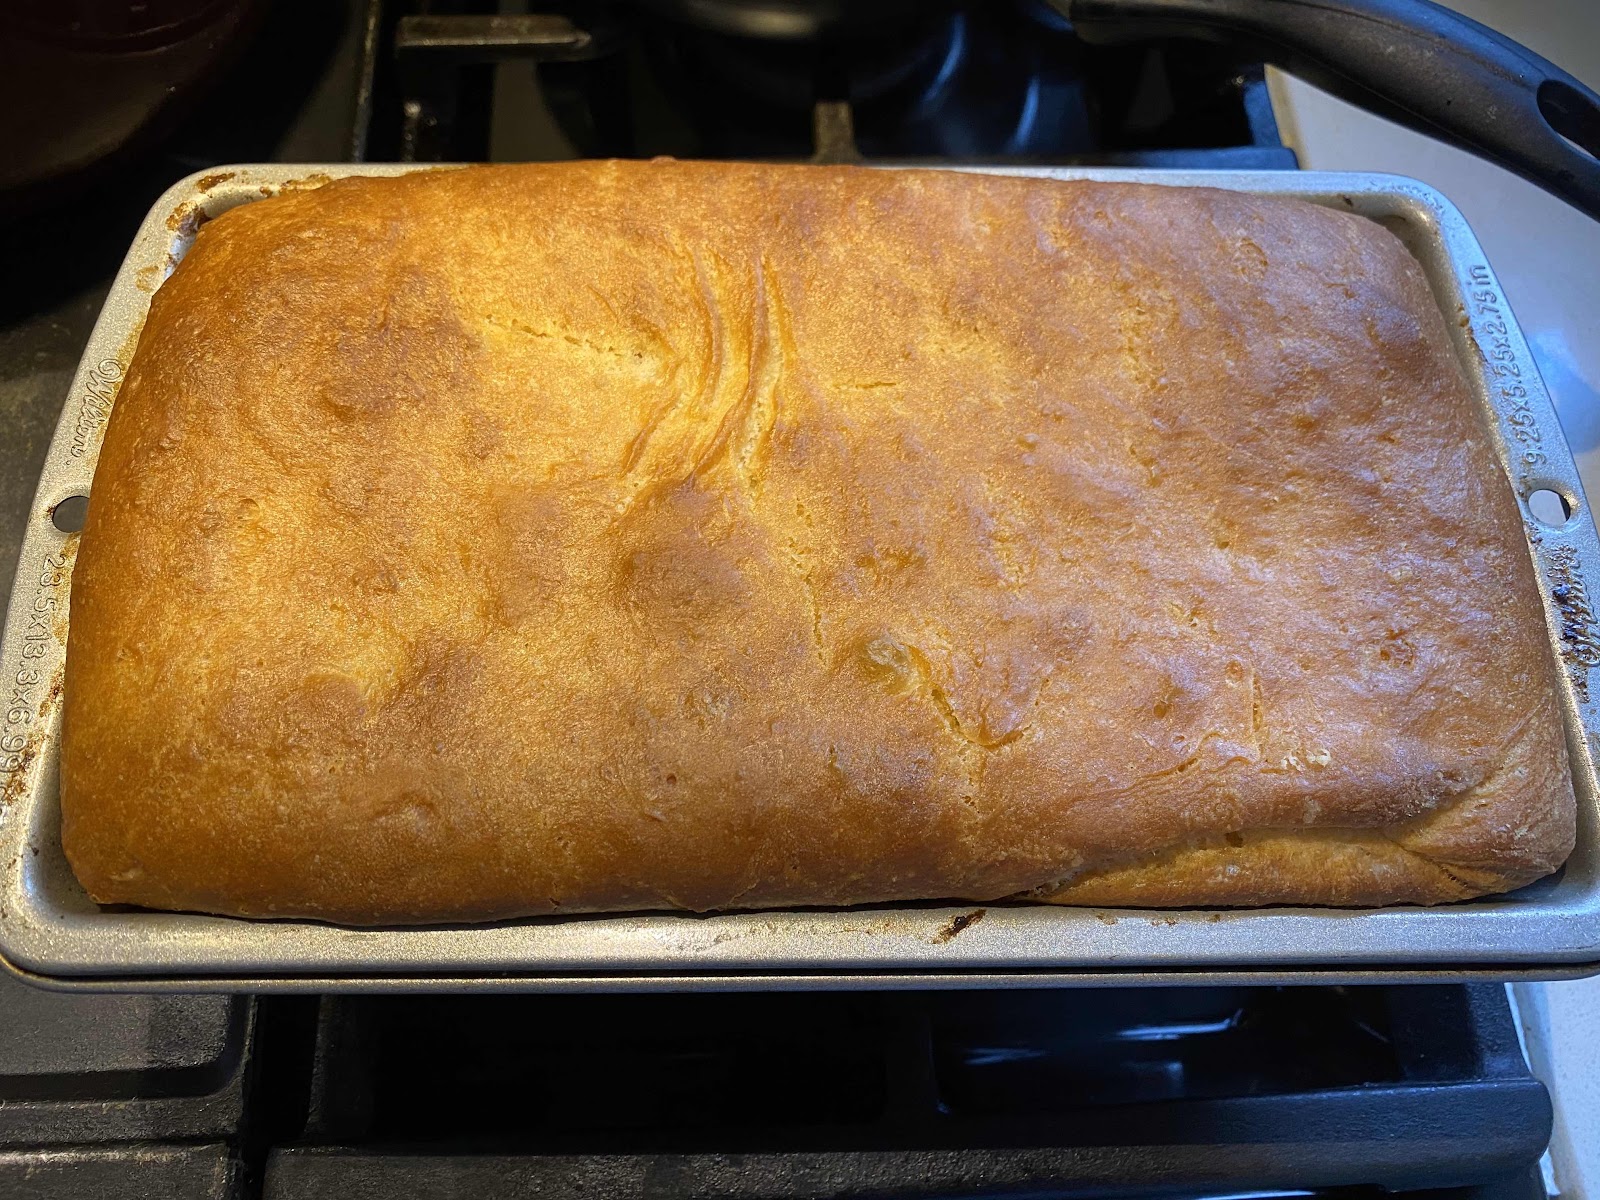
320F 30 min (The cake was still raw after 30 min so I moved it to bottom rack and bake another 30 min)

I used 9x5 inch loaf pan lined with parchment paper


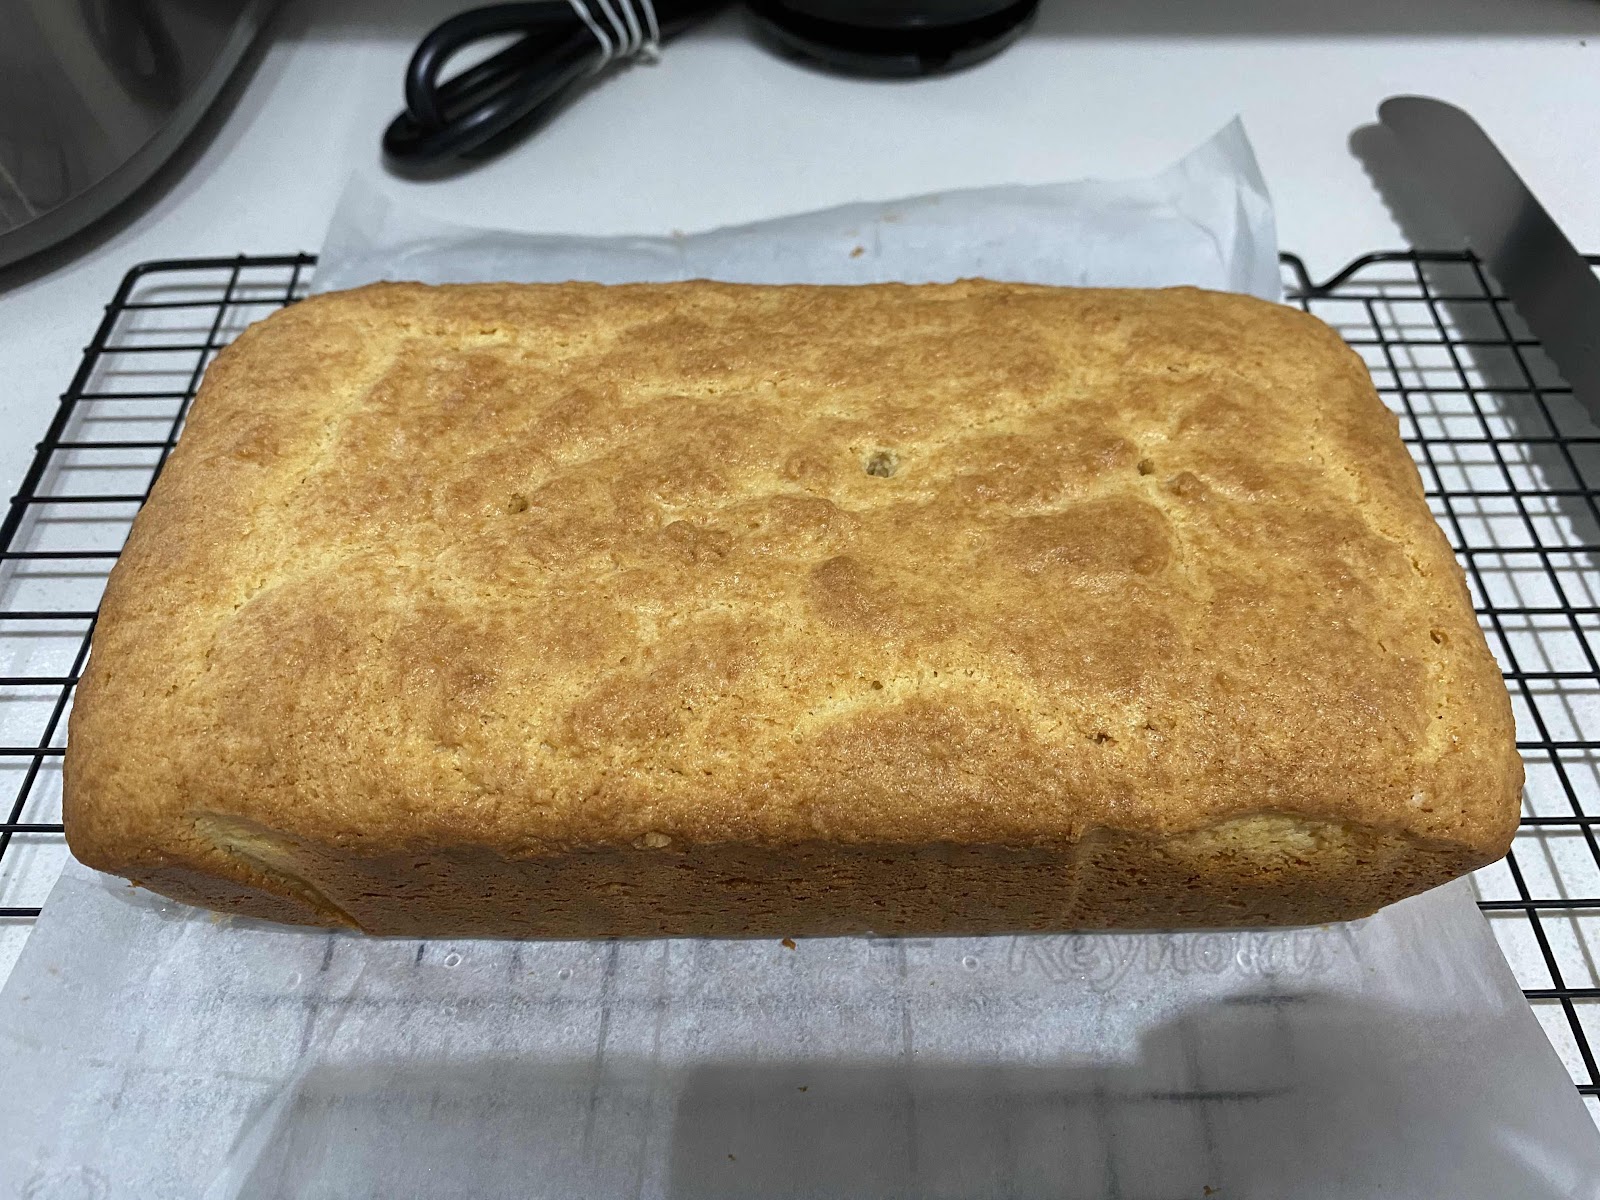
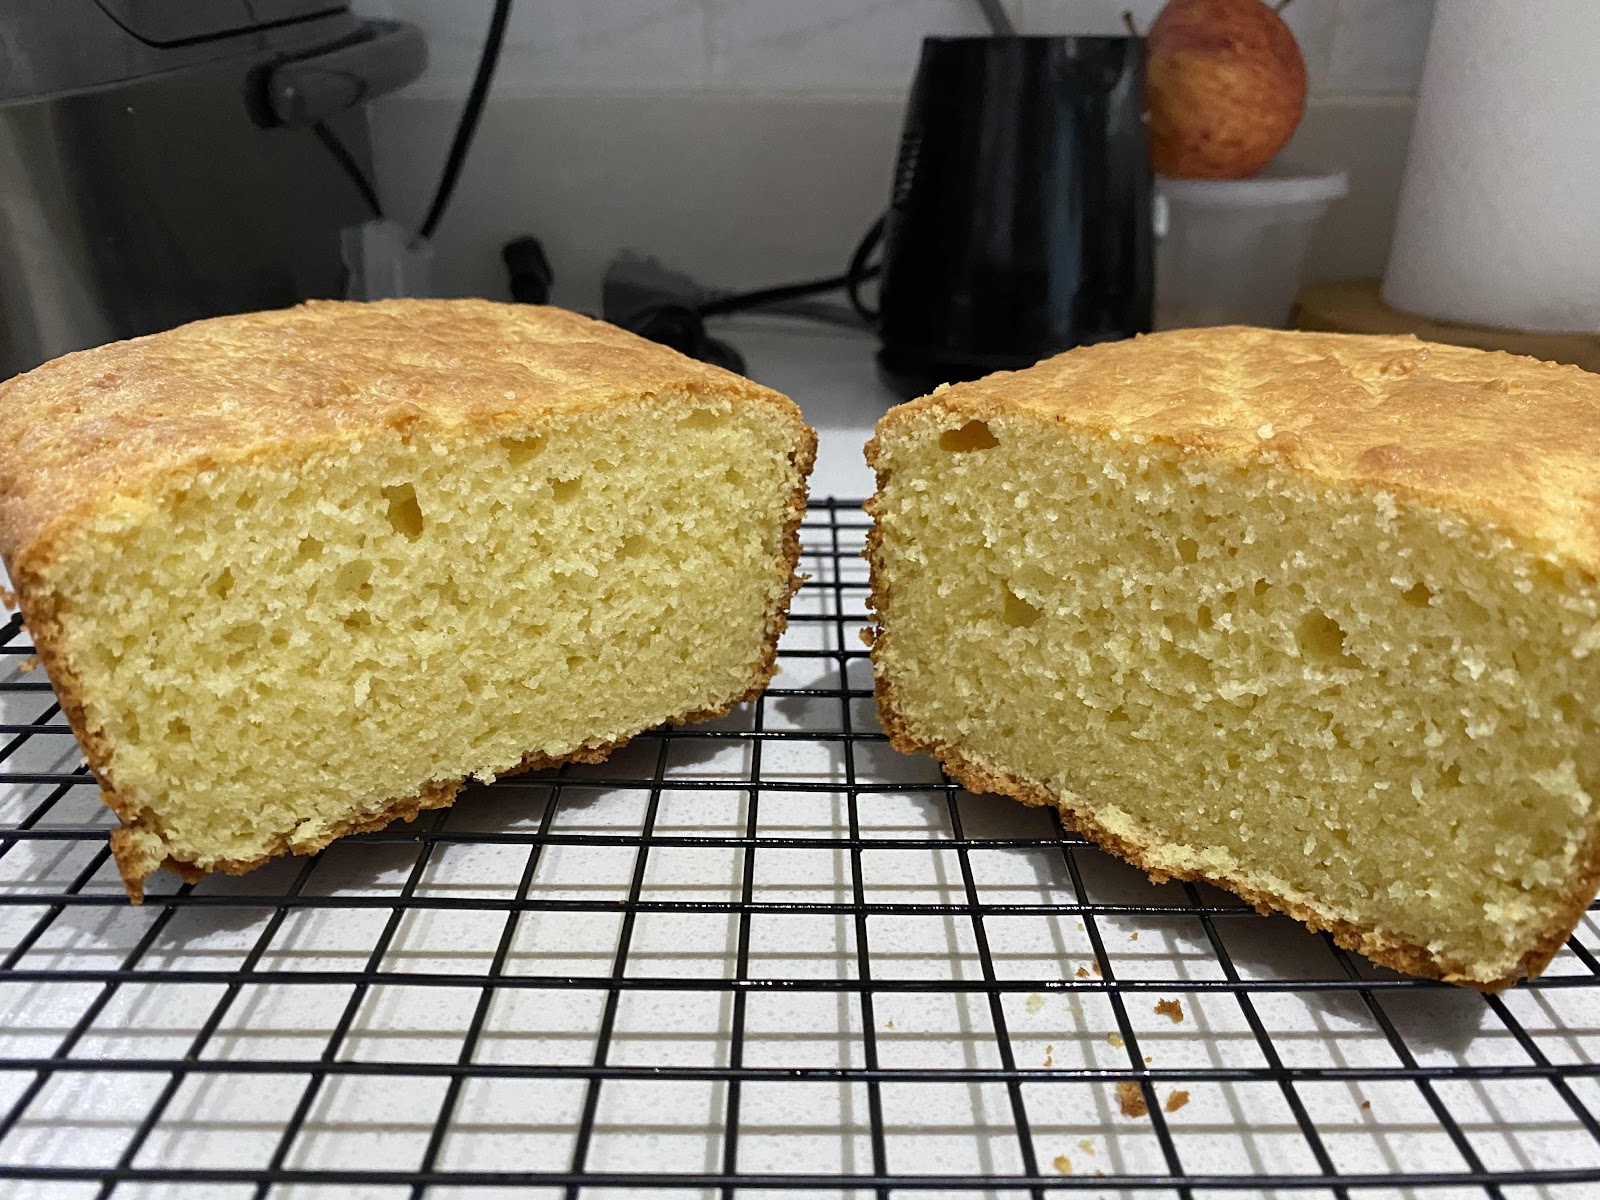
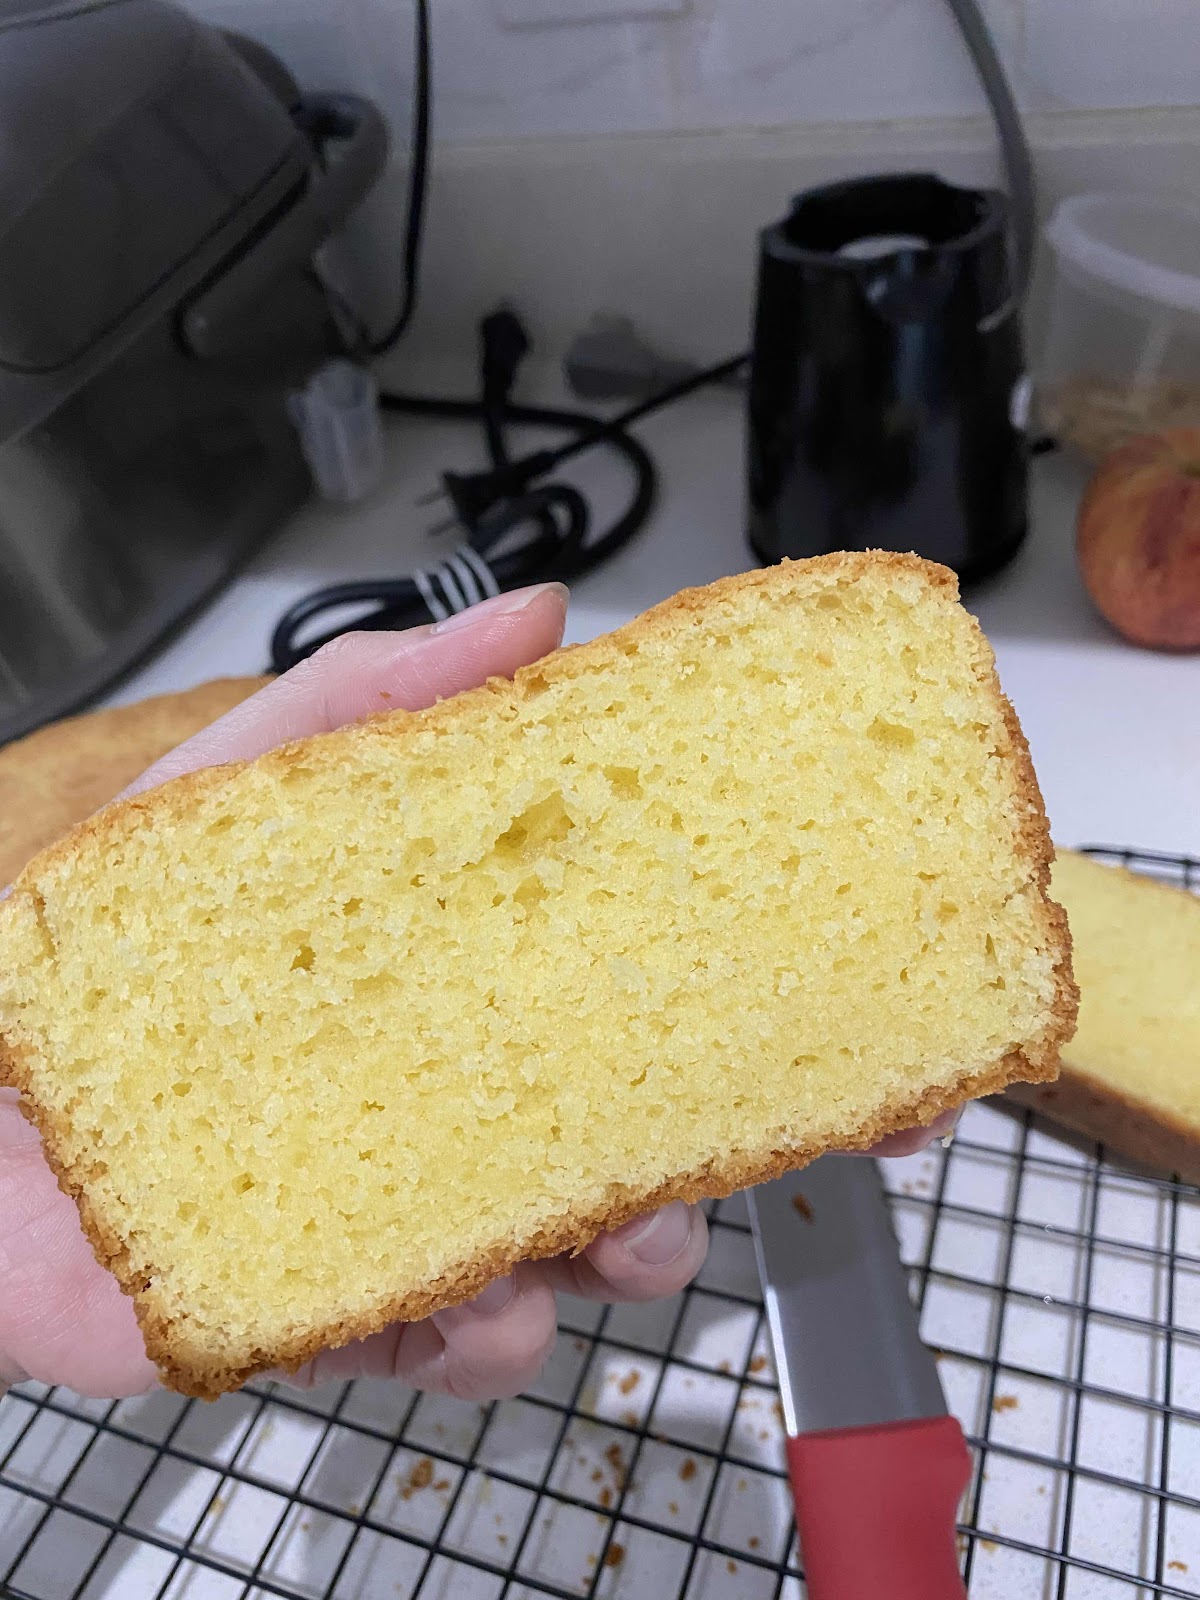
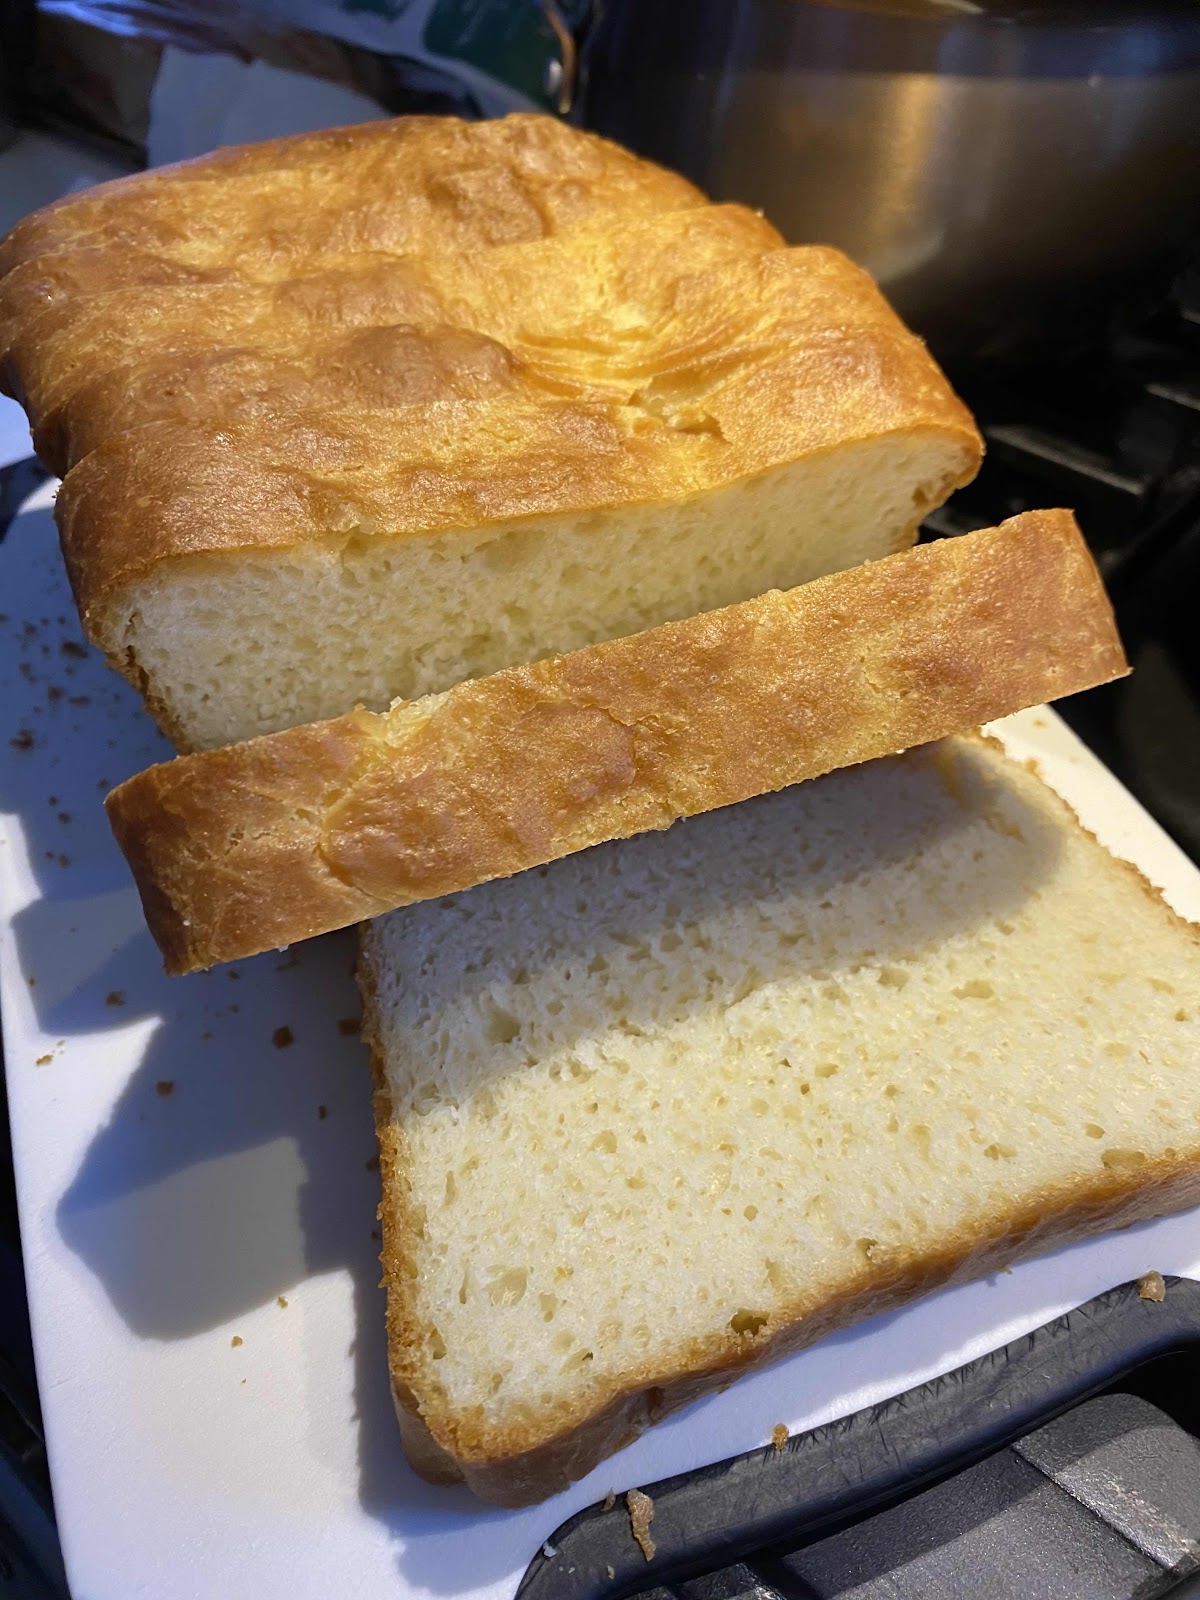
The cake is soft and fluffy with crunchy outer layer. Yum!


Sunday, May 3, 2020

Pizza Crust

This is the first time I made pizza from scratch and being a big fan of King Arthur Flour, I followed their recipe even though I could not buy any King Arthur Flour since they had been out of stock since mid March.

https://www.kingarthurflour.com/recipes/pizza-crust-recipe

This pizza crust recipe is versatile; you can make for tonight's dinner or have it 2 days later. This recipe yields either 2 round pizza or 1 rectangular pizza. It is a relatively easy recipe and only requires few ingredients. I used a 9 x 13 inch pan and 1 cup of lukewarm water.


Ingredients


  • 2 teaspoons active dry yeast or instant yeast
  • 7/8 to 1 1/8 cups (198g to 255g) lukewarm water*
  • 2 tablespoons (25g) olive oil
  • 3 cups (361g) King Arthur Unbleached All-Purpose Flour
  • 1 1/4 teaspoons salt
*Use the lesser amount in summer (or in a humid environment), the greater amount in winter (or in a dry climate), and somewhere in between the rest of the year, or if your house is climate controlled.

Instructions


  1. If you're using active dry yeast, dissolve it, with a pinch of sugar, in 2 tablespoons of the lukewarm water. Let the yeast and water sit at room temperature for 15 minutes, until the mixture has bubbled and expanded. If you're using instant yeast, you can skip this step.
  2. Combine the dissolved yeast (or the instant yeast) with the remainder of the ingredients. Mix and knead everything together—by hand, mixer or bread machine set on the dough cycle—till you've made a soft, smooth dough. If you're kneading in a stand mixer, it should take 4 to 5 minutes at second speed, and the dough should barely clean the sides of the bowl, perhaps sticking a bit at the bottom. Don't over-knead the dough; it should hold together, but can still look fairly rough on the surface.
  3. To make pizza up to 24 hours later, skip to step 5.
  4. To make pizza now: Place the dough in a lightly greased bowl, cover the bowl, and allow it to rise till it's very puffy. This will take about an hour using instant yeast, or 90 minutes using active dry. If it takes longer, that's OK; just give it some extra time.
  5. To make pizza later: Allow the dough to rise, covered, for 45 minutes at room temperature. Refrigerate the dough for 4 hours (or for up to 24 hours); it will rise slowly as it chills. This step allows you more schedule flexibility; it also develops the crust's flavor. About 2 to 3 hours before you want to serve pizza, remove the dough from the refrigerator.
  1. Decide what size, shape, and thickness of pizza you want to make. This recipe will make one of the following choices:
    Two 1/2"-thick 14" round pizzas (pictured);
    Two 3/4"-thick 12" round pizzas;
    One 3/4" to 1"-thick 13" x 18" rectangular (Sicilian-style) pizza (pictured);
    One 1 1/2"-thick 9" x 13" rectangular pizza;
    One 1"-thick 14" round pizza.
  2. Divide the dough in half, for two pizzas; or leave it whole for one pizza.
  3. If you're making a rectangular pizza, shape the dough into a rough oval. For a round pizza, shape it into a rough circle. In either case, don't pat it flat; just stretch it briefly into shape. Allow the dough to rest, covered with an overturned bowl or lightly greased plastic wrap, for 15 minutes.
  4. Use vegetable oil pan spray to lightly grease the pan(s) of your choice. Drizzle olive oil into the bottom of the pan(s). The pan spray keeps the pizza from sticking; the olive oil gives the crust great flavor and crunch.
  5. Place the dough in the prepared pan(s). Press it over the bottom of the pan, stretching it towards the edges. You'll probably get about two-thirds of the way there before the dough starts shrinking back; walk away for 15 minutes. Cover the dough while you're away, so it doesn't dry out.
  6. When you come back, you should be able to pat the dough closer to the corners of the pan. Repeat the rest and dough-stretch one more time, if necessary; your goal is to get the dough to fill the pan as fully as possible.
  7. Allow the dough to rise, covered, till it's noticeably puffy, about 90 minutes (if it hasn't been refrigerated); or 2 to 2 1/2 hours (if it's been refrigerated). Towards the end of the rising time, preheat the oven to 450°F.
  8. Bake the pizza on the lower oven rack till it looks and feels set on top, and is just beginning to brown around the edge of the crust, but is still pale on top. This will take about 8 minutes for thinner crust pizza; about 10 to 12 minutes for medium thickness; and 12 to 14 minutes for thick-crust pizza. If you're baking two pizzas, reverse them in the oven (top to bottom, bottom to top) midway through the baking period.
  9. To serve pizza immediately: Remove it from the oven, and arrange your toppings of choice on top. Return to the oven, and bake on the upper oven rack for an additional 10 to 15 minutes, until the crust is nicely browned, both top and bottom, and the cheese is melted. Check it midway through, and move it to the bottom rack if the top is browning too much, or the bottom not enough.
  10. To serve pizza up to 2 days later: Remove the untopped, partially baked crust from the oven, cool completely on a rack, wrap in plastic, and store at room temperature. When ready to serve, top and bake in a preheated 450°F oven, adding a couple of minutes to the baking times noted above. Your goal is a pizza whose crust is browned, and whose toppings are hot/melted.
  11. Remove the pizza from the oven, and transfer it from the pan to a rack to cool slightly before serving. For easiest serving, cut with a pair of scissors.

Tips from our Bakers

  • Make pizza any shape or size or thickness you like; the above guidelines are simply suggestions. Understand that the thickest-crust pizza will need to bake longer than the thinnest-crust version.
  • To freeze partially baked pizza crust: Bake crust as directed in step 13. Remove from the oven, cool to room temperature, wrap well, and freeze for up to 3 months. When you're ready to serve pizza, remove the crust from the freezer, and allow it to thaw, loosely wrapped, at room temperature. Once it's completely thawed, complete pizza by starting at step 15 above.
  • What else can you to with this tasty crust? How about fresh, hot cheese stuffed bread sticks? Our step by step blog will show you what pitfalls to avoid on your way to these pizza shop favorites.
  • Want to experiment with different cheeses beyond the standard mozzarella? Choose those that melt well: Fontina, cheddar, Jack, provolone, brick, Gouda, and Muenster are all good candidates.
  • To add flexibility to your schedule, let the dough rise once at room temperature, gently deflate it, then cover and put in the fridge overnight. Next day, remove the dough from the fridge and stretch it into its pan. Let it rest and warm up until slightly puffy, then proceed with the recipe as written.
  • If you like pizza with a deep golden brown, crispy crust, bake on a baking stone. Preheat the stone in the middle of the oven for 45 to 60 minutes. Shape and top your pizza on parchment paper or a baker's peel and when you're ready to bake, slide the pizza onto the hot stone (parchment and all, if you're using parchment).


On the left is anchovy, middle plain cheese, right is bacon spinach. It came out thin crust like Sicilian pizza.


Thursday, April 23, 2020

Thumbprint Cookie

This is an easy recipe if you want to kill some time with your kids:

https://video.cookist.com/video/an/XJ0D0eSw5SuppzKF

I followed the recipe to the dot and the sweetness is not over-powering, which is great.

INGREDIENTS

1/2 cup butter, softened

1/4 cup icing sugar

1 cup flour

1/2 tsp vanilla extract

lemon zest from 1 lemon

1/4 tsp raspberry jam (for each cookie)

Mix butter with sugar, add vanilla and lemon, then add flour. Form into 1 tablespoon balls then 'print' each cookie with your thumb. Makes 12 cookies.

This was all done by my 6-year-old. We filled half the cookies with grape jelly and half with orange marmalade.


Wednesday, April 22, 2020

French Baguette

This is a combination of a family-friend recipe and a YouTube video:

https://www.youtube.com/watch?v=m08i8oXpFB0

The recipe is detailed but I have never made French baguettes before so the video is a good visualization on how the dough is supposed to look at each step.

Since I am not sure if I can distribute the recipe, I will just leave it out. You can follow the recipe on the YouTube video and I am sure it will turn out great too!


I think the skin turned out more chewy than crispy but the bread is soft and tasty overall and I am happy with the result. I will definitely make this again if I have time. There is a lot of down time but you will have to be home the whole day to make this work. I did (4 x 45 min) + 15 min resting + 20 min proofing + 30 min oven warming + 60 min baking + 60 min standing. That was my whole day. But at least we had fresh baguette for dinner.


Thursday, April 2, 2020

Basic White Bread

It is almost impossible to get bread from supermarket these days. This is a fairly simple recipe and I have most of the ingredients at home so I gave it a try after going to the store for instant yeast.

This recipe yields 2 loaves so I halved it. I did not add salt because I used salted butter but the bread came out tasting like it's missing salt so I think I will add a little bit next time.


https://www.browneyedbaker.com/white-bread-recipe/

Ingredients:

  • teaspoons
    instant yeast
    (two 0.25-ounce packets)
  •  
  • ¾
    cup
    + 2⅔ cups warm water
    (divided)
  •  
  • ¼
    cup
    granulated sugar
  •  
  • 1
    tablespoon
    salt
  •  
  • 3
    tablespoons
    unsalted butter, cubed, at room temperature
  •  
  • 9 to 10
    cups
    all-purpose flour
  •  
  • 3
    tablespoons
    unsalted butter 

Directions:

  1. In the bowl of a mixer, stir to dissolve the yeast in ¾ cup of the warm water, and let sit for 5 minutes. Add the remaining 2⅔ cups water, sugar, salt, room temperature butter, and 5 cups of the flour and stir to combine.
  2. Using a dough hook, mix on low speed and gradually add the remaining flour until the dough is soft and tacky, but not sticky (you may not need to use all of the flour). Continue to knead until a soft ball of dough forms and clears the sides of the bowl, about 7 to 10 minutes.
  3. Place the dough in a lightly greased bowl and turn it over so it is completely coated. Cover with plastic wrap and set in a draft-free place to rise until doubled in size, about 45 minutes to 1 hour.
  4. Turn the dough out onto a clean, lightly floured surface. Gently press it all over to remove any air pockets. Divide the dough in two and, working with one piece at a time, gently pat it into a 9x12-inch rectangle. Roll up the rectangle, starting on the short end, into a very tight cylinder. Pinch to seal the seams and the ends, tuck the ends of the roll until the bread, and place into greased 9-inch loaf pans. Cover the loaves loosely and place in a draft-free area until doubled in size, 30 to 45 minutes.
  5. Position an oven rack on the lowest setting and preheat the oven to 400 degrees F.
  6. Brush the loaves with some of the melted butter. Bake the loaves for 30 to 35 minutes, rotating halfway through, until golden brown (an instant-read thermometer inserted into the center should read 195 degrees F).
  7. Remove from the oven and immediately brush with more of the melted butter. Allow to cool for 10 minutes, then remove from the pans and cool completely before slicing. The bread can be stored in an airtight bread bag or wrapped tightly in plastic wrap at room temperature for up to 4 days. It can also be frozen for up to 1 month.


The top did not rise as much but the taste is pretty good overall and it stays fresh in airtight container until we finish it 3 days later. It tastes more sweet than salty since I used salted butter and did not add additional salt. But just a tiny hint of sweet. This is an easy recipe and I will definitely be making this again.


UPDATE:


I made another loaf 2 weeks later and they came out much puffier on top. I used egg wash instead of melted butter. I also added salt this time.